Simple to Use / Changeover Without Tools
The PumpCap™ Capping Machines are designed with the user in mind. All adjustments are made by hand, no tools are necessary to change from one cap and bottle combination to the next.
Below is a summary of changeover tasks and how they are completed.
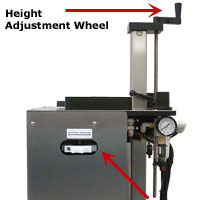
Changeover to a shorter or taller bottle
Raise or lower the capping assembly by turning the hand wheel at the top of the PumpCap. Turning clockwise raises the capper, counterclockwise lowers it.
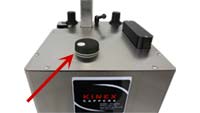
Adjusting the torque
Quickly change the torque output of the capping motor by rotating the external torque dial with your fingers. Turning the dial to the left increases the torque. Turning the dial to the right decreases the torque.
External Torque
Adjustment Dial
Changeover to a smaller or larger cap
The initial position, or pre-capping position, of the drive wheels is set by the Maximum Diameter Control Knob located at the top of the capping assembly. To increase the distance between the drive wheels when setting up for a larger cap size, turn the Maximum Diameter Control Knob to the right. To decrease the distance between the drive wheels to set up for a smaller cap size, turn the Maximum Diameter Control Knob to the left.
Set the initial position of the drive wheels so that the bottle and cap can easily pass between the two front drive wheels and slide into position well centered between all four drive wheels in preparation for capping. If the cap cannot pass through the two front drive wheels, turn the Maximum Diameter Control Knob clock-wise, this will increase the distance between the drive wheels.
Maximum
Diameter
Control Knob
Drive Wheels
in Initial
Position
(Pre-capping)
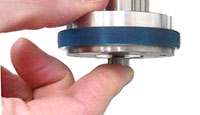
Changing Drive Wheels
Quick release buttons are located at the bottom of each of the drive shafts. The quick release buttons make changing from one drive wheel size to another fast and easy.
Push the quick release button with your finger and the drive wheel will release into your hand. Slide the new drive wheel onto the drive shaft. Push the quick release button and slide the drive wheel onto the drive shaft. The wheel will lock into place.
Changing Drive Wheels
Changeover to a wider or narrower bottle
The PumpCap Capping Machine with Standard Base has a “V” shaped backstop designed to align the bottle for capping. The Backstop slides forward and back to accommodate bottles of different widths.
The Backstop can be quickly converted to work with either short or tall containers. The raised configuration is best for taller containers. By easily removing the risers, the Backstop can be laid flat which is perfect for short containers.
When changing to a wider or narrower bottle, loosen the thumb screws on the Backstop. This allows the Backstop to slide forward or back. Align the bottle so the cap is centered between the four drive wheels. Slide the Backstop against the bottle and tighten the thumb screws. Your bottle is properly centered and ready to be capped.
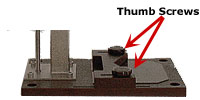
Backstop - Flat
For Short Bottles
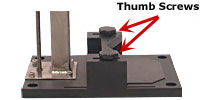
Backstop -
Raised
For Taller Bottles
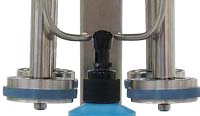
Adjusting the guide rods
The guide rods allow you to align the pump portion of the cap so that it is oriented correctly when the machine has completed tightening the cap.
The guide rods are adjustable. The guide rods can be raised or lowered, swiveled in or swiveled out. To adjust the guide rods, turn the corresponding guide rod clamp counterclockwise, this will unlock the guide rods so they can be moved.
Adjust the guide rods to properly align the pump portion of the cap during the capping process. When the guide rods are properly aligned, turn the clamps clockwise to lock the guide rods in place.
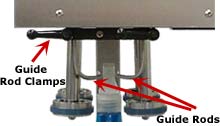
Guide Rods
Aligning
a Trigger Spray Cap
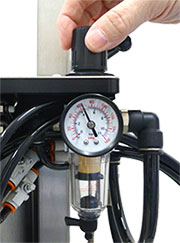
Adjusting the clamping pressure
The PumpCap uses four drive wheels made of urethane to create grip on a cap. Clamping pressure is required during the capping process to push the soft urethane wheels into the cap. When the urethane is pushed into the cap, it grips the cap which enables the capping motor to tighten the cap onto the bottle.
Though it is rarely necessary with the PumpCap, you may need to change the clamping pressure when you change from one cap and bottle combination to another.
The clamping force is controlled by the air cylinder pressure regulator located on the right side of the capping machine. To adjust the pressure, pull up on the black knob, turn to the right to increase pressure, or turn to the left to decrease the pressure. After completing the adjustment, push the black knob down to lock into place.